About The Source Material
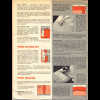
The cover of the pamphlet.This page is derived from pamphlet which was published by Coats and Clarks as a teaching aid in 1959. I was given a copy by my Great Aunt around the time I graduated from college. I've been particularly impressed by this pamphlet, because it contains so much information about hemming, including methods that I had never heard of before. Unfortunately, Coats and Clarks no longer publishes useful sewing aids on this vein.
I've tried to reproduce the text and images faithfully, but if you just want to look at the full scanned pages you'll find them down at the bottom of this page.
Introduction (cover page)
Hems are up! Hems are down! Every so often this fashion news is flashed around the world . . . and a new hem level is fixed by the fashion authorities. It must be remembered, however, that this is merely the indication of a trend. Within certain limits established by fashion, the exact level of your hemline is determined by whatever is becoming to YOU.
Every time you finish dressing, look at yourself critically in a full length mirror. Observe the relation of the length of your garment to the length of your body, including the height of heels you are wearing. You will soon develop a feeling for the proportion that is most flattering to you.
Making a hem is a job with which the average girl or woman is confronted every now and again. On a self-made garment, the hem is the final detail of construction. On a ready-made garment, it is frequently the only place where a change is needed. Last year's garments can very often be brought into the current fashion merely by an adjustment of the hemline.
The importance of a good hem cannot be overemphasized. A poor hem is the surest mark of a "homemade" garment. In general, the best hem is the most inconspicuous one, and every step in making a hem is planned to this end. Bulkiness is eliminated by cutting down the depth and by reducing the fullness of the hem; ridges will not appear if pressing is done carefully; stitching becomes practically invisible on the outside of a garment when the proper hemming stitch is used; puckers are avoided by a slight loosening of the stitch.
FIVE POINTS for a SUCCESSFUL HEM
- The Right Hem in the Right Place... see chart on Page 2.
- Accurate Markings... best done with help, but possible without. Pages 2-3.
- Pressing with Know-How... is almost as important as sewing. Page 3.
- Efficient Preparation... makes all the difference. See Page 3 for turning, marking the depth of the hem and reducing fullness.
- Neat Finish... see Stitches for Hems, Page 4, and Hems for Garments, Section 2.
THE RIGHT HEM IN THE RIGHT PLACE (page 2)
The chart below contains our recommendations for the hem or hems most suitable for a particular fabric and cut of garment. For sheer fabrics the choices are definite; for all others, the hem finishes are largely interchangeable. Directions for hems are given in Section 2.
Pay special attention to depth of hem. Most hems on garments for adults are from 2" to 3" deep. On full garments of gored or circular cut the hem is 1" deep, except for sheers, where it is very narrow. A very full straight skirt of sheer fabric often has an extra-deep hem as part of the design.
CUT OF SKIRT, DRESS, OR COAT TYPE OF FABRIC HEM FINISH DEPTH OF HEM
(trimmed)Straight
narrow
full . . . gathered, pleated (pleats pressed or unpressed)
Gored or circular (up to 1/2 circle)lightweight silks, synthetics, blends
medium-weight cottons, linens, synthetics, blendsturned and stitched hem
tailor's hem2" - 3" heavy and medium-weight wools, silks, synthetics, blends, heavy cottons tailor's hem
hem with seam bindingGored or circular
full (wider than 1/2 circle)fabrics of any weight except sheers tailor's hem hem with seam binding 1" sheer fabrics hand-rolled hem
edge-stitched hem1/4" picot-edged hem See Section 2 Any cut raveling fabrics hem with seam binding 1" - 3" 
Straight full
sheer fabrics, children's clothes, dirndl skirtssheer fabrics in silk, cotton, synthetics, blends, medium and lightweight cottons turned and stitched hem
machine-finished hem3" - 8" or more Gored or circular all non-wool fabrics when "Stay-Stitched Plus" (see p. 4) hem with seam binding 1" - 3" FACED EDGES
BLOUSESall fabrics see "Faced Hems," Section 2.
see "Hems on Blouses," Section 2.ACCURATE MARKING (pages 2 and 3)
Before marking the hemline, the following considerations are important, no matter what method is employed.
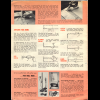
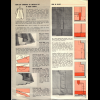
The yardstick method.THE GARMENT . . . A new garment must be fitted and finished except for the hem. For an alteration, the old hem must first be ripped open and pressed. Shortening a garment presents no problem; but a garment cannot be lengthened if them crease is worn or discolored or if the fabric has faded. A bias-cut garment should be checked at season's end. If hemline has sagged, hem should be ripped open before final cleaning and pressing of season, and new hem made only when garment is to be worn again.
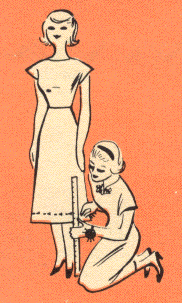
THE WEARER . . . While hem is being marked, wear garment (with belt, if called for) over proper foundation . . . wear shoes with heels of same height as those you will wear with garment . . . stand straight, with arms down and weight on both feet. A person marking for you may find it helpful if you stand on table or desk. Safest procedure is for helper to move around wearer, but it is easiest if wearer rotates slowly while helper marks.
HEIGHT OF HEM FROM FLOOR . . . Unless you know precise measurements beforehand, have someone measure distance of desired hemline level from floor.
The Methods of Marking which follow include those done with the help of another person and those done without help. The most accurate marking for all hems - and the only reliable method for a full gored or circular garment - is done with a helper using a yardstick or a hem marker. A somewhat different technique of marking is required for a perfectly straight skirt (opposite page).
Equipment for marking hems is described on page 4.
After completing the marking by one of the methods given, go on to EFFICIENT PREPARATION (opposite page).
The table method.USING A YARDSTICK . . . Hem level is marked on yardstick with a rubber band. Helper, standing yardstick upright on floor against garment, marks hemline with pins parallel to floor, about 3" apart.
USING A HEM MARKER . . . A helper may use either a pin marker or a chalk marker, set to proper height, and proceeds according to directions that come with the marker. One type of chalk may be used by a person working alone. If you use it, keep arms down, at least to elbows, and shoulders relaxed. Revolve slowly and carefully, so as not to distort line, especially when marking the back.
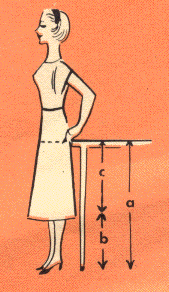
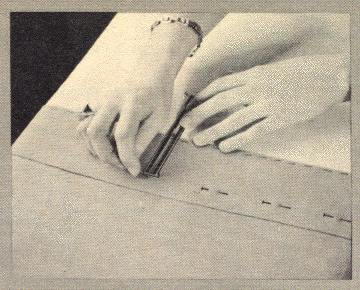
USING A TABLE AS A GUIDE . . . Another way to mark alone is to stand against a table or other piece of furniture with a flat top reaching to just below widest part of hips. Using edge as ruler, make a line of markings about 6" apart around hips with tailor's chalk (good and sharp). Proceed very slowly and carefully, so as not to distort line, especially at back. Remove garment carefully and place on ironing board, right side out.
Measure height of table from floor "a." Deduct hemline height, "b," from "a." This will be measurement "c"; mark it on your yardstick. This distance, measured down from chalk-marked line all around (be sure to keep stick at right angles to the line!), will give hemline level. Mark it with pins or chalk.
USING A PATTERN . . . Every pattern has a definite allowance indicated for hem. You can use this allowance to mark hem without trying on garment. However, you must be absolutely sure that pattern is the correct length for you. If an alteration to adjust length is necessary, it must be done with great exactness before cutting out garment.
When garment is ready for hem, place it right side up on ironing board. Mark hemline with pins or chalk by measuring specific depth of hem from cutting edge with adjustable hem gauge (p. 4) or a cardboard one (see below); or use "automatic" hem gauge (p. 4). Turn up hem (next column), but do not press.
At this point, try on garment to double-check length and evenness. Figure and posture can make quite a difference in the hang of a garment. If skirt is just a little too long or short, it can be adjusted 1/2" up or down from marked hemline. If it is uneven, mark it by one of the other methods suggested.
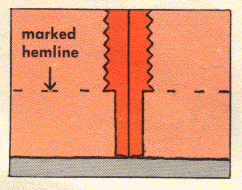
ON A STRAIGHT SKIRT . . . A perfectly straight skirt, full or narrow, is generally cut on the straight grain. If a well-defined crosswise pattern such as plaid, border print or horizontal stripe is present, hemline must follow pattern, regardless of other considerations. Mark height of skirt from floor in only one place, on a seam.
Place garment right side up on ironing board. Measure distance from cut edge to mark. Set or make a hem gauge (p. 4) to this measurement. Measure in from cut edge of fabric as shown, and mark hemline with pins or chalk.
PRESSING WITH KNOW-HOW (page 3)
Careful pressing can make all the difference between a good hem and a poor one. Remember that pressing is not ironing. In pressing, the iron is moving along fabric surface with a succession of "pats." "Pats" can be light or heavy as needed, but the iron is never pushed along or rotated. In most cases, pressing is done on wrong side of garment, with steam setting on steam iron or with a dampened press cloth (see p. 4). On woolen fabrics, such pressing is often used to reduce fullness and is then known as "shrinking."
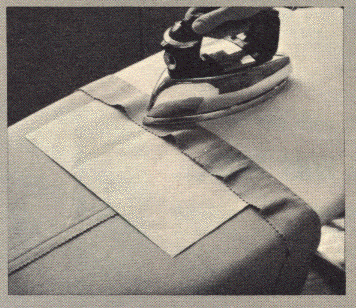
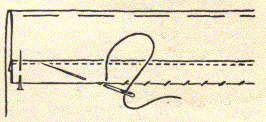
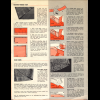
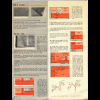
The direction of the iron . . . When reducing fullness on a hem or when doing final pressing, press up from fold with point of iron toward top of garment, as shown. When pressing the first fold in hem, press lightly around edge.
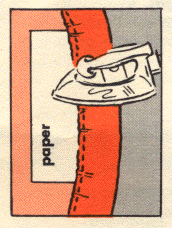
To avoid ridges on outer fabric, be sure your ironing board is well padded. When shrinking gathers, use a strip of brown paper between hem and garment, as shown.
EFFICIENT PREPARATION (pages 3 and 4)
For hems on sheer fabrics of full circular cut, or for a machine-stitched hem, omit the following steps and refer directly to the specific heading in Section 2.
For all other hems, place garment on ironing board, wrong side out, and proceed as follows:
GRADE SEAMS on bulky fabrics . . . between marked hemline and cut edge, trim 1/8" off seam allowances as shown.
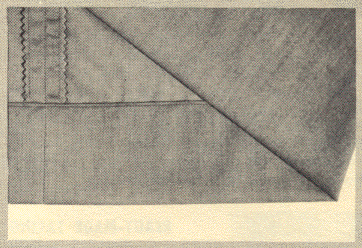
TURN UP HEMS on marked hemline; pin fold as shown, straightening it out wherever necessary so as to have an even line all around. Then baste close to fold, removing pins as you go along. Press fold lightly.
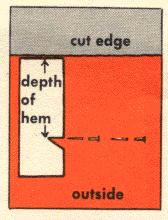
MARK DEPTH OF HEM . . . See chart on page 2 and set or make hem gauge (p. 4) to proper depth for cut and fabric of your garment. From fold, measure desired depth all around, marking with pins through one thickness of fabric only, as shown or with sharpened tailor's chalk.
TRIM FABRIC all around on marked line. Remove marking pins. To finish hem on a straight garment, see Section 2 for hems recommended on chart for your cut and fabric. On a garment of gored or circular cut (except full in sheer) the next step is to reduce fullness.
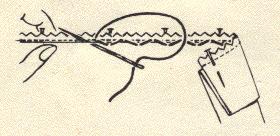
REDUCE FULLNESS . . . In garments of gored or circular cut there is an excess fullness in the hem (near seams in gored garments, all around in circular ones) when hem is turned up. Two easy methods of reducing the extra fullness are given below. In the Easing the Fullness method, the fullness is drawn up after a line of machine stitching is made 1/4" below cut edge. In the Stay-Stitch Plus method, the fullness is drawn up while the stitching is being done. Stay-Stitch Plus is very quick and satisfactory, but not all fabrics lend themselves to it - try it out first on a piece of the fabric you are using. It is not recommended for a turned and stitched hem.
For the first step in reducing fullness of hem edge, keep garment on ironing board and proceed as follows:
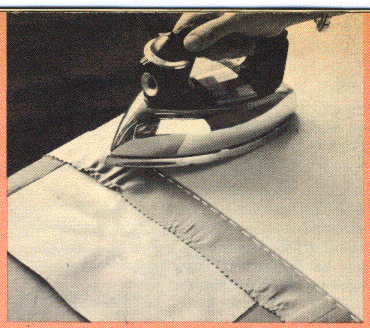
Locate and Mark Fullness . . . Insert a piece of brown paper between the garment and the hem (to prevent a ridge in pressing). Beginning at a point where seam matches seam, press lightly up from fold all along hem, with iron pointing up, as shown. At points where fabric naturally falls into a ripple, press ripples very lightly into pleats of not more than 1/4", until hem is fitted to garment. These little pleats serve only to locate the places in hem where fullness needs to be drawn up, and they will be eliminated in next step, no matter which of the two following methods you use.
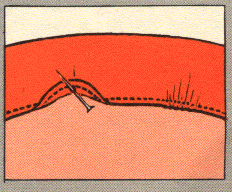
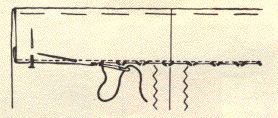
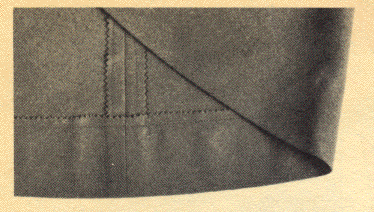
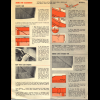
Ease the Fullness . . . Make a line of machine-stitching (10 stitches to the inch) all around hem edge through one thickness of fabric only, 1/4" below cut edge of hem, leaving all the little pressed pleats open. Place garment on ironing board, wrong side up. Where little pleat markings occur, pull up bobbin (under) thread with a pin. Draw up fullness in each pleat, forming groups of small gathers as shown. Press, and finish as directed below.
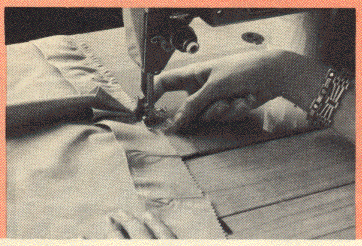
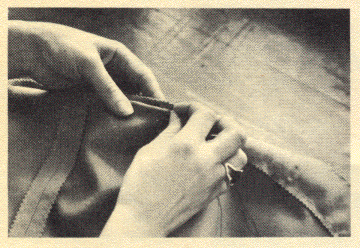
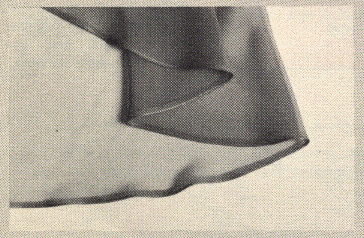
Stay-Stitch Plus . . . Start a line of machine-stitching (10 stitches to the inch) through one thickness of fabric only, 1/4" below cut edge of hem, leaving all the little pressed pleats open. a few inches before stitching reaches a marked pleat, press index finger of right hand firmly against presser foot as you continue sewing - this will make excess fabric pile up in gathers as shown in photo. The harder you press, the tighter the gathers. Continue around hem, repeating gathering process as necessary. When stitching is completed, handle garment carefully when returning it to ironing board, because gathers can come out easily.
Press, shrinking out gathers in wool; on non-shrinkable fabrics, press gathers as flat as possible. To finish hem on garment of gored or circular cut, see Section 2 for hems recommended on chart for your cut and fabric
STITCHES FOR HEMS (page 4)
Begin at a side seam with know hidden inside seams. Stitches taken on garment side must be very small (pick up one or two threads) and at least 1/4" apart. Do not pull thread tight. Finish on hem or seam (never on garment side) with a few over-and-over stitches, ending with a loop or two. Clip thread, not to close.
For inside hemming, the hem is folded back (see Tailor's Hem, step 3) and stitches are taken inside, between hem and garment, leaving hem edge free. For flat hemming, edge of hem is sewn flat on garment. All the stitches shown below can be used for either method, except blind-hemming stitch, which is used for flat hemming only. The proper stitches are recommended in the instructions for each hem.
SLIP-STITCH
Slip-stitch (for inside hemming) . . . On garment side, pick up one thread in fold, then take a stitch through edge of hem as directed for specific hem.
Slip-stitch (for flat hemming) . . . On garment side, pick up one thread next to edge of hem, then pass needle through fold at top of hem as shown.
BLANKET STITCH
A locked stitch, permitting wider stitches; worked from left to right.
Blanket stitch (for inside hemming) . . . On garment side, pick up one thread in fold, then take a stitch through edge of hem as directed in specific hem, passing needle over looped sewing thread as shown.
Blanket stitch (for flat hemming) . . . On garment side, pick up one thread next to edge of hem, then take a stitch through edge of hem, passing needle over looped sewing thread as shown.
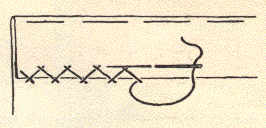
CATCH-STITCH
A somewhat elastic stitch, good on knitted fabrics; worked from left to right needle pointing from right to left.
Catch-stitch (for inside hemming) . . . Take a stitch through edge of hem as directed in specific hem, then, on garment side, pick up on thread in fold.
Catch-stitch (for flat hemming) . . . On garment side, pick up one thread next to edge of hem, then take a stitch in hem as shown.
BLIND-HEMMING
Blind-hemming (for flat hemming) . . . On garment side, pick up one thread next to edge of hem, then pass needle through edge of hem as shown.
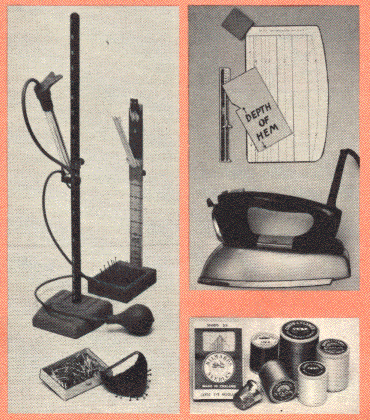
[EQUIPMENT (page 4)]
to turn a perfect hem with perfect ease
... YOU WILL NEED ...FOR MARKING THE HEMLINE . . . A yardstick or well-finished wood, firm and straight, on which hem level may be indicated, OR a hem marker, which combines a yardstick and movable indicator. With one type, pins are used, and with another type, powered chalk. Both require the help of another person, except one chalk variety which can be operated by wearing of garment alone. All kinds are best with a heavy base.
FOR PINNING . . . Fine dressmaking pins that will not mark fabric . . . a wrist pincushion, either purchased or made by attaching a small pincushion to a piece of elastic fitted to wrist.
FOR PRESSING . . . A steam iron, or a dry iron with heat control dial and press cloth . . . cheesecloth makes a good press cloth on all fabrics . . . on wool, self-fabric prevents a shine.
FOR MARKING HEM DEPTH . . . A hem gauge - 4" or 6" metal or plastic ruler with movable marker . . . or make hem gauge from cardboard, as shown on p. 3. With another type, known as the "automatic" hem gauge, also shown here, you can turn and press the hem without pinning and basting, and measure and mark the depth as well. Tailor's chalk is a flat square of clay (good on all fabric) or wax (for wool only). Sharpen edges when they become dull. Do not use blackboard chalk.
And, of course, thread and needle selected according to weight of fabric.
HEMS FOR GARMENTS (pages 5 through 8)
To finish all hems and facings, remove pins or basting and press lightly, using a dry press cloth.
TAILOR'S HEM
An excellent, inconspicuous, and flat hem, durable because sewing thread is protected between hem and garment; may be used on most heavy and medium-weight fabrics. Sewn with inside hemming only (p. 4).
A garment is ready for this hem after hemline has been marked and hem turned out and trimmed to proper depth.
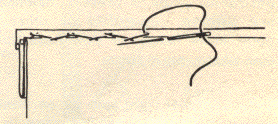
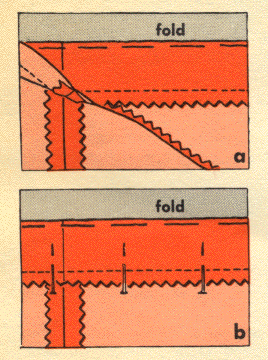
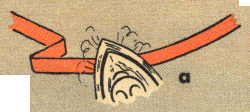
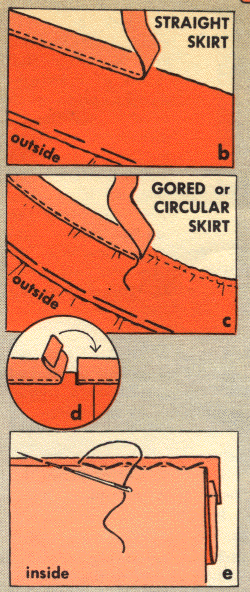
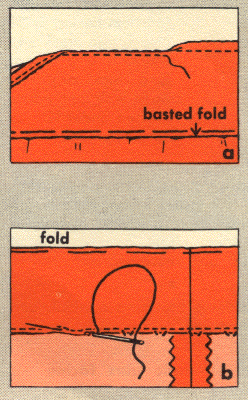
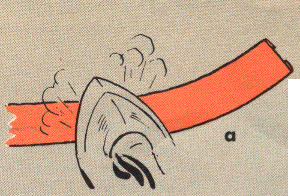
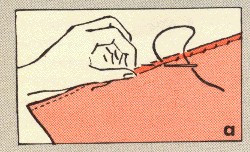
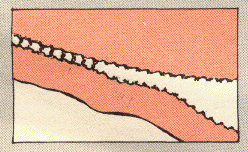
- Edge of hem is made ready . . . On a straight garment, make a line of machine stitching through one thickness of fabric about 1/4" from cut hem edge. On a gored or circular garment, reduce fullness by one of the methods on pages 3 - 4. In either case, pink edge (a) or overcast by hand or by machine.
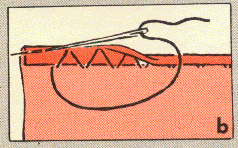
- Pin or baste the hem to garment about 1/4" below stitching line, as shown (b), matching seams (work on ironing board or other flat surface).
- To sew the hem with inside hemming (p. 4) hold garment with hem edge up. Turn hem back, making a fold in outer fabric even with machine-stitching on hem edge, as shown. Use slip-stitch, blanket stitch, or catch-stitch, taking stitches on hem side through machine-stitching.
HEM WITH SEAM BINDING
Suitable for all medium and heavyweight fabrics; important for fabrics that ravel easily; essential when "Stay-Stitch Plus" is used to reduce fullness on other than wool fabrics. Sewn with either inside or flat hemming (p. 4).
A garment is ready for this hem after hemline has been marked and hem turned up and trimmed to proper depth. On a garment of gored or circular cut, fullness has been reduced by one of the methods on pages 3 - 4.
Seam Binding . . . Boiltex® Rayon Seam Binding is 1/2" wide straight tape with a durable woven edge, available in 44 colors, black and white.
If seam binding is used on washable garments, it is advisable to pre-shrink it first by soaking in water. For a straight skirt, let seam binding dry, then press. For a circular skirt shape seam binding while damp as shown in next column.
On a straight skirt, seam binding is applied "as is." On a circular skirt, a sufficient length of seam binding is prepared by steam-pressing into a slight curve to follow curve of hem (a). This is known as "swirling."
- Edge of hem is made ready . . . Topstitch binding, easing gently, to right side of fabric about 1/4" from cut edge as shown (b, c). For a neat finish, overlap turned-under end as shown (d).
- Pin or baste the hem to garment (for inside hemming, just below seam binding). Match seams.
- To sew the hem with inside hemming (p. 4), fold hem back to about 1/8" from top edge of seam binding; use slip-stitch (e), blanket stitch or catch-stitch, taking stitches on hem side just below top edge of seam binding. For flat hemming, use blind hemming or blanket stitch.
Bias Seam Binding . . . Boiltex® Rayon Bias Seam Binding has turned-under edges and is 1/2" wide . . . available in 16 colors, black and white . . . particularly good on circular skirts . . . can be applied either by topstitching to edge of hem (see straight seam binding, above), or like a Ready-Made Facing (see FACED HEMS).
TURNED AND STITCHED HEM
Good for light and medium weight fabrics on straight garments or narrow gored ones. Sewn with inside or flat hemming (p. 4).
A garment is ready for this hem after hemline is marked and hem is turned up and trimmed to proper depth.
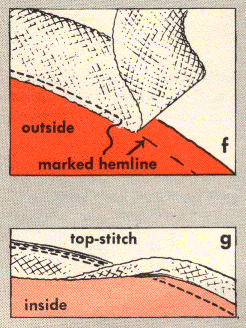
- Edge of hem is made ready . . . Make a line of machine stitching through one thickness of fabric about 1/4" from cut edge. If garment is gored, ease fullness with pin (p. 3. Do not use "Stay-Stitch Plus"). Turn edge under on stitching line and topstitch (a).
- Pin or baste the hem to garment (for inside hemming, 1/4" below top-stitching). Match seams.
- To sew the hem with inside hemming (p. 4), fold hem back, even with top-stitching; use slip-stitch, blanket stitch or catch-stitch, taking stitches on hem side through top stitching; for flat hemming (b) use slip-stitch or blanket stitch.
MACHINE-FINISHED HEM
A quick and easy method of making hems on straight full skirts of medium-weight cotton, such as children's clothes, dirndls, aprons and the like . . . looks like a turned and stitched hem, but is made by machine, using the regular presser foot . . . edge is stitched and hem is caught in place at the same time. Try it first on a fabric sample. A garment is ready for this hem when hemline has been marked (see Straight Skirt, p. 3). Work with wrong side of garment up.
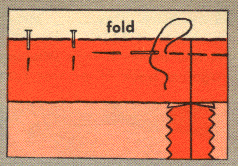
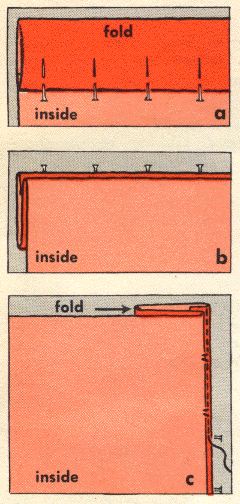
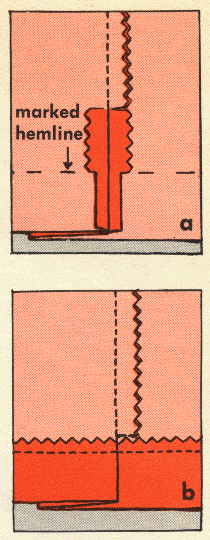
- Turn in raw edge of hem 1/2" and crease. Turn up hem on marked hemline and press a sharp crease. Pin hem in place as shown (a).
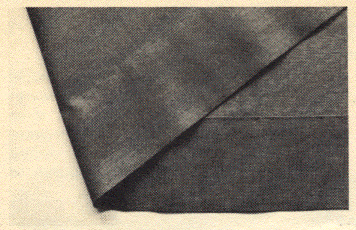
- Fold entire hem back against right side of garment as shown (b), with hem edge extending about 1/16" beyond fold.
- Stitch on extending edge of hem (10 - 12 stitches to the inch) for 5 stitches, ending with machine needle up. Then pivot vabric slightly, put needle down into body part of garment once, and bring needle up; pivot fabric again so that you are working on extending edge, and repeat as shown (c).
This hem can also be made with a zig zag machine or a zig zag attachment. Follow manufacturer's directions.
FACED HEMS
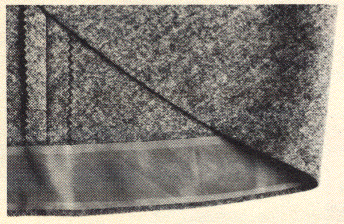
A hem is faced when there is not enough fabric to make a regular hem; or when fabric is extremely bulky; or for decorative purposes. Facings can be used on garments of straight cut or circular cut, and the facing can be ready-made, self-made, or made of horsehair braid.
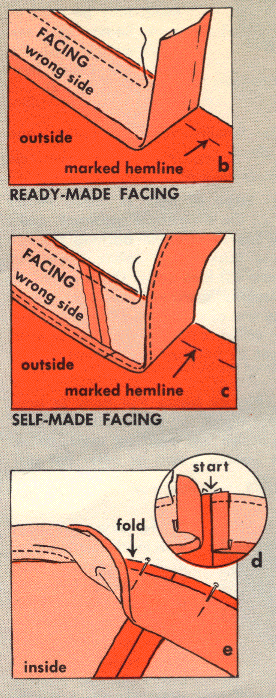
READY-MADE FACING . . . Boiltex® Taffeta Hem Facing is made in 16 colors and Cotton Hem Facing in 22 colors; also black and white. It is a 3-yard long bias strip, 2" wide, with both edges pressed under 1/4" for easy application.
SELF-MADE FACING is usually made of strips cut 2 1/2" wide on the true bias and joined until you have a strip a few inches longer than length to be faced. The top edge is clean-finished before applying; as follows: Make a line of stitching 1/4" from edge; turn edge under on line of stitching (no basting or pinning necessary) and top-stitch.
A garment is ready to be faced when hemline has been marked, and excess fabric trimmed off 1/2" below marked line.
Both the ready-made facing and the self-made bias facing are applied in the same way.
On a straight skirt, facing is applied "as is." On a circular skirt, prepare a sufficient length of facing by steam-pressing into a slight curve which will follow curve of hem (a). This is known as "swirling."
- Beginning at a seam, place right side of facing to right side of skirt, raw edges even (on ready-made facing, open out edge fold.) For a neat finish, turn end back as shown (d). Stitch on crease or 1/4" from edge (b and c). Overlap ends as shown (d).
- Turn facing to inside on marked hemline. Pin fold (e) and baste close to fold, removing pins as you go along. Press fold lightly.
- Pin facing in place, working on ironing board or other flat surface.
- Sew facing to garment, using slip-stitch or blanket stitch for flat hemming (p. 4). Slip-stitch joining.
NOTE: Another type of self-made facing is the shaped facing, now very seldom used. Cut on same grain and pattern as bottom edge of garment and seam same as garment. Clean-finish top edge. Pin facing over bottom of garment, right sides together, seams matching, edges even. Pin or baste, and stitch 1/2" from edge. Trim seam allowance to 1/4". Turn facing to inside; baste and press bottom edge; sew down top edge with slip-stitch or blanket stitch.
HORSEHAIR BRAID comes in several widths. It is used to stiffen the hem of a full skirt.
A garment is ready for a horsehair facing after hemline has been marked and excess fabric trimmed off 1/4" below marked line.
- Along top edge of braid there is a special thread for drawing up. Topstitch bottom edge of braid to right side of fabric, with edge of braid at marked line, as shown (f). Overlap ends about 2".
- Wide Braid . . . turn braid to inside of garment and pin, working on ironing board or other flat surface. Baste close to fold, removing pins as you go along. On a circular skirt, draw up free edge of braid by pulling thread in braid as you pin and baste. Sew to garment with blind hemming.
- Narrow Braid . . . turn braid to inside of garment and topstitch close to edge through braid and fabric as shown (g). This stitching, being very close to edge, is not noticeable on right side. Catch loose edge of braid to seams only.
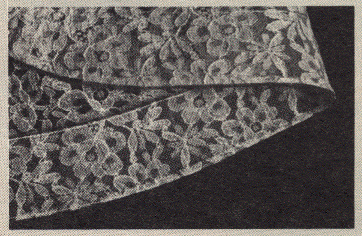
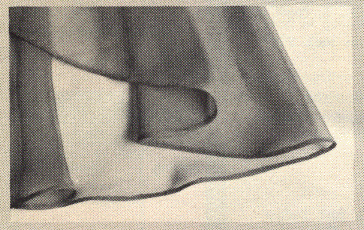
HEMS ON GARMENTS OF CIRCULAR CUT IN SHEER FABRICS
Since garments of circular cut have a tendency to sag, it is advisable to get some of the stretch out by allowing a garment to hang for about forty-eight hours before marking hemline. Fasten waist of garment to clothes hanger with clothespins, as shown, and attach a small weight to bottom edge on true bias to speed stretching.
There is a choice of four narrow finishes for this kind of garment.
A rolled hem and a simplified rolled hem are elegant hand finishes, used not only for hems in circular skirts of chiffon, voile and similar fabrics, but also for handkerchiefs, scarves, and the like.
An edge-stitched hem is done by machine and is quick and easy.
A picot-edged hem, which is very satisfactory, is done by having bottom edge of garment commercially hemstitched.
The garment is ready for one of these finishes after hemline has been marked (p. 2).
Note: All machine-stitching on sheer fabrics is done with a strip of tissue paper under fabric. Paper is torn away afterward.
ROLLED HEM... Make a line of stitching on marked hemline. Trim away excess fabric very close to stitching line (about 1/16"). Starting at a seam, begin rolling edge over line of stitching with thumb and forefinger of left hand. Put needle through roll, then alternately catch a thread in fabric and put needle through roll. Space stitches about 1/4" apart. After every few stitches, draw up thread to secure roll. (a).
SIMPLIFIED ROLLED HEM . . . In this the line of stitching is omitted. Trim off fabric 1/4" from marked hemline. Fold in raw edge 1/8". Slip needle in fold so that knot will be hidden. Catch a thread in garment below raw edge, then slip needle through fold as shown. Space stitches on garment about 1/4" apart. After every few stitches, draw thread tight to form a roll. (b).
EDGE-STITCHED HEM . . . Make a line of stitching on marked hemline. Trim away fabric 1/4" below stitching. Turn edge to wrong side, folding on stitching line (no pinning or basting necessary) and top-stitch on right side, 1/8" from fold. If a second line of stitching is desired, make first line a little closer to edge.
PICOT-EDGED HEM . . . Placing a strip of tissue paper under fabric, make a line of basting along marked hemline, stitching through tissue. Have commercial hemstitching done over basted line. Remove paper only after hemstitching is done. Cut as shown.
HEM IN PLEATS
On a skirt pleated all around, make hem before pressing pleats. Choose him according to fabric and preference.
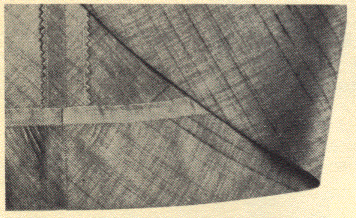
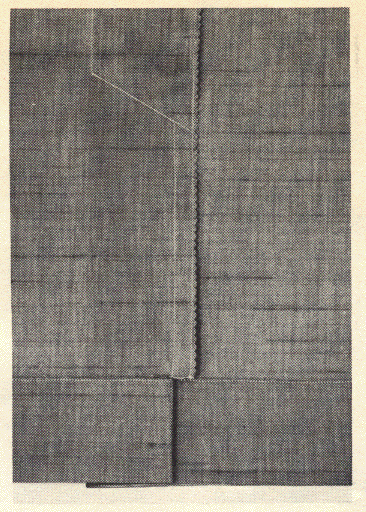
On a pleat with a seam, press sem to one side, then mark hemline. On the seam, mark up from hemline the depth of the hem; at this point clip both seam allowances and press seam open as shown. Grade seam - i.e., trim seam allowances (a). Turn up hem on marked line and continue with selected finish (b).
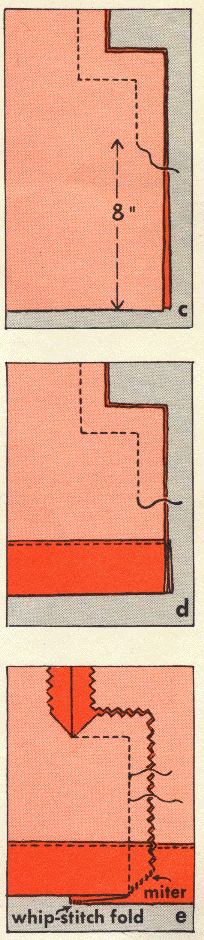
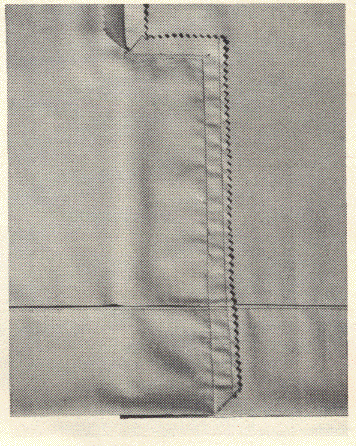
Another method on a pleat with a seam, particularly good for fabrics like wash and wear, which cannot easily be pressed: When stitching seam in pleat, leave seam open for about 8" from raw bottom edge (c). Complete garment, including hem. Be very careful to have both sides even at open seam (d). Stitch open section of seam through finished hem. Miter corner of seam (turn in, don't trim) at bottom as shown, and whipstitch together. At outside fold of pleat, whipstitch hem edges together for about 1/8" as shown (e).
HEM IN A BLOUSE
Hems in blouses should be as flat and narrow as possible.
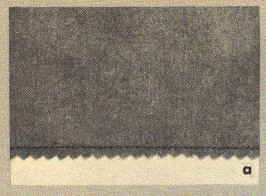
If the fabric is firmly woven, no hem is necessary. Make a stay stitch line 1/4" from raw edge; pink edge as shown (a).
To make a flat, turned hem make a stay-stitched line 1/2" from raw edge; turn edge to wrong side on stitching line just made, turn in 1/4" on raw edge and topstitch (b).
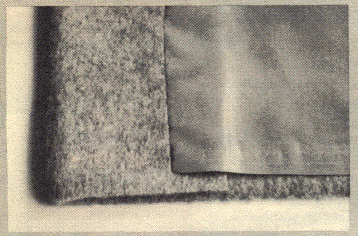
HEM ON A COAT
The length of long coats varies with the length of dresses. In general, a coat is 1" longer than a dress. Depth of hem is 2" to 3".
When a hem is to be put in a coat or jacket, either as the last step on a new garment being made or as an alteration, it is a good idea to hang up garment and pin or baste lining to outer fabric all around, at a level 8" to 12" above hem. This keeps top part of lining in its place.
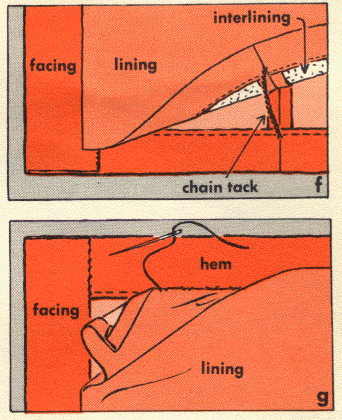
A new coat . . . Lining and interlining (if any) have been sewn in, but, 8" to 12" above cut bottom edge at both sides, lining and inside edge of facings are left free.
Alterations . . . Shortening a coat is always possible. A coat cannot be lengthened if it has faded or if fold at hem has become worn or discolored or if hem has been cut away at facing edge (see b). To begin alterations, rip lining and interlining (if any) at both sides, freeing front facings. Rip lower part of facings and hem. Press carefully to remove hem crease.
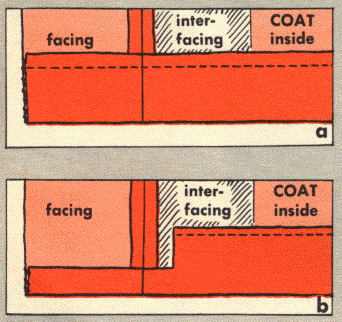
Mark length of coat in regular manner. At both front edges, trim off interfacing just a little above marked hemline. Turn up hem, mark and trim depth of hem (see page 3). Trim off lining 1" below turned-up length of coat.
When interlining is attached to body of coat, trim it at marked hemline. If it is attached to lining, trim it 2" shorter than lining.
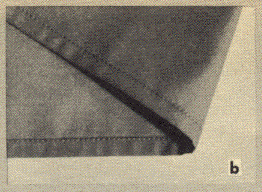
- Make hem on coat, including facing; use either Tailor's Hem or Hem with Seam Binding. Overcast side edges of hem as shown (a). If you are sure coat will not be lengthened again and if fabric is extremely bulky, you will get a flatter corner by cutting out excess fabric on hem of facing, as shown (b).
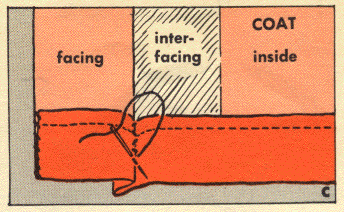
- Press facings to inside. Slip-stitch facing hem to garment hem 1/2" from facing seam the full depth of hem as shown (c). (This is unnecessary if front edges are topstitched. Topstitching should be put in or restored at this point.)
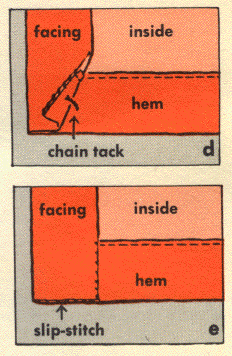
- On a long coat, catch facings to garment at hem with a French tack or chain tack (see below) about 1/2" long as shown (d). On a short coat or jacket slip-stitch the bottom edge of facings to coat as shown (e).
- On a long coat, finish coat lining with a 2" turned and stitched hem or a hem with seam binding. If there is an interlining attached to lining, turn hem up over it.
Slip-stitch front edges of lining to facings. At each seam, catch lining to coat with a French tack or chain tack 2 1/2" to 3" long (f).
On a short coat or jacket, trim lining to length of finished hem. Turn lining under 1/2" and press.
Pin bottom fold of lining just below edge of hem and slip-stitch. The extra length of lining will form a pleat to allow for ease (a). Slip-stitch front edges of lining to facings.
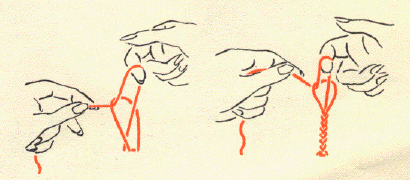
A chain tack, used to anchor one surface loosely to another, is made as follows: Insert needle through one surface; take a small stitch for reinforcement. Take another stitch, but instead of drawing up, leave a loop, as shown. Reach through loop with forefinger and, using it as a hook, make a tight crochet chain, continuing until chain is the length you want tack to be. Pass needle through end and attach to other surface.