My Thoughts on the Pattern
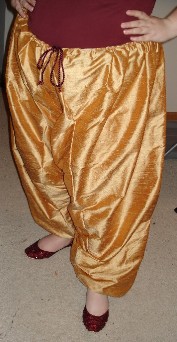
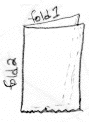
The finished pants.When I was first trying to figure out how to make traditional Turkish pants (also known as parachute pants or salwar) I poked around and found several tutorials. My favorite was the one on the Renaissance Tailor. I really like their tutorial, but I did find it a bit confusing (which is part of why I made this page).
The main strengths of these pants are that they do not waste fabric and they are quite comfortable. Additionally, as the Renaissance Tailor mentions, if you are practicing an active sport (like fencing) the crotch of your pants is not going to split under the strain.
The main disadvantages of these pants are that they use a lot of fabric and require sewing some nasty bias seams very carefully (see also this article from Threads magazine about bias garments). I believe the traditional method for dealing with these seams involves sewing very carefully so as to not stretch the fabric and then binding them by hand. If you're using decent, non-ravely fabric and a straight stitch to put the pants together you could probably skip the binding step (but the pants won't last as long). You could also most likely get away with just zig zag stitching over the edges of the bias seam in place of binding.
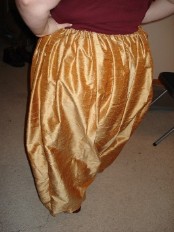
The back of the finished pants.Another thing to consider when you think about making these pants is how you want to finish the waist and ankles. I opted for a draw string waist in my first pair, but in retrospect, I really needed to get a better drawstring. I picked the cord for beauty and ended up with something that wouldn't hold a knot to save it's life. A similar choice is needed for the ankles. I thought this was a bit easier, since my ankles don't change size when I sit down. You can either gather the ankles with elastic or a draw string or put on proper cuffs. The first time I made proper cuffs I was appalled at how easy they were, so don't let their construction deter you.
I just want to reiterate here, this pattern, including some of the instructions, came from the Renaissance Tailor. I felt that different explanations and images might make it easier to understand. You should go read the original pattern before you look at my instructions. Heck, maybe the original will make sense to you and you won't need my help at all!
I found that making a "test" piece by folding and cutting a sheet of paper was helpful to understanding the cutting process without ruining fabric by doing it wrong.
Since making these pants I've found a number of sites like this one suggesting that the two legs could be made separately and then sewn together (along the vertical crotch seam) after the gussets are attached. This sounds easier than having to sew the gusset into the point. But I haven't needed to make more pants, so I haven't tried that method yet.
The Instructions
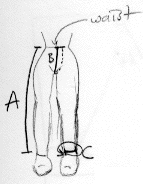
Step 1.Step 1: Measure the following distances
- A = waist to ankle (I measured along the outside of my hip, since it was easier)
- B = "full rise", ie. belt buckle, under the crotch, to where your belt would be in the middle of your back
- C = around your ankle
Step 2: Figure out how much fabric you need. Fabric needed = (A + (1 to 3 inches for a poof at the bottom) + (2" for ankle casing if needed) + (2" for waist casing if needed)) X 2
The Renaissance Tailor suggests that you can use either 45" or 60" wide fabric. I had a hard time getting the gusset to be wide enough with 60" wide fabric. Perhaps thinner people will have an easier time of it.
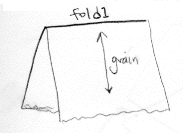
Step 3.Step 3: Fold your pre-washed and measured length of fabric in half so that the two cut ends are together. Lie the folded fabric down on a table or floor to make this easier.
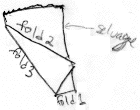
Step 4.Step 4: Fold the fabric in half again in the other direction (so that the selvages are together).
Step 5.Step 5: Fold a diagonal across the corner which is between both of your folds. Be sure to leave enough space up by the cut ends to allow for seam allowance (and waist casing if you want that) and enough space on the bottom edge so that each leg bottom will be at least your C measurement from step 1. If you want less giant drapes of fabric in the middle of your pants keep this close to your C measurement (remembering to include seam allowance).
When you measure across the shorter leg of the triangle you formed with your fold, it should be at least 1/2 of your B measurement. If it's not, make your fold bigger until it is. Be careful not to make your leg bottoms too small for your ankles.
Step 6.Step 6: Cut through all layers along your diagonal fold.
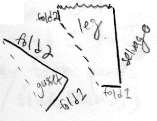
Step 7: Cut along the bottom of the leg section (along the original fold you made in step 3).
Step 8.Step 8: Unfold all these pieces and look at them. Be sure to treat the gusset piece very carefully so as to not stretch the edges.
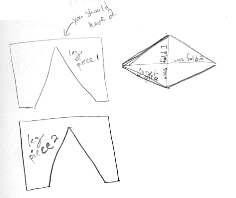
You should now have a diamond shaped gusset piece and two funny looking leg pieces (the front and back of your pants).
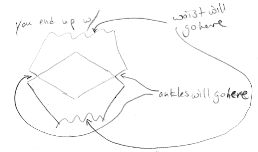
Step 9.Step 9: Sew the gusset into the two pants pieces (see diagram).
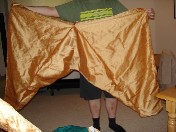
After step 10.Step 10: Sew the sides of the pants together.
Step 11: Sew in a waist and ankle bands/cuffs or casings.
Step 12: Wear pants and rejoice!